Plum Object Atelier — Practical reuse & low-cost interior craft Under-£15 Material Index
Course Track 02 · Structural & Surface Renewal

Furniture Worth Reworking

Not every pavement find deserves three days of labour, yet many pieces rejected for ugly orange varnish or chipped melamine edges have decades of functional life left. Our furniture lessons teach you how to separate structural integrity from superficial wear—and how to execute high-impact interventions in a small flat without a dedicated workshop.

Pre-Project Diagnostic

The 5-Minute Structural Triage

Before carrying a chest of drawers or dining chair home from a British Heart Foundation furniture store, Emmaus depot, or kerbside giveaway, run through these three non-negotiable checks.

Check 01 · Joinery

The Diagonal Racking Test

Press firmly across opposite corners of a table or stool. If a mortise-and-tenon joint shifts cleanly, it can be knocked apart, scraped free of brittle animal glue, and clamped with aliphatic resin (PVA wood glue). If blown high-density fibreboard (MDF) or wet chipboard is crumbling around cam-locks, walk away.
Check 02 · Veneer & Timber

Blistered Veneer vs. Solid Rails

Inspect the underside of tabletops and the back edges of drawer fronts. Small veneer blisters under 40mm can be slit along the grain with a scalpel, injected with hide glue, and ironed flat under brown parcel paper. Delaminated water-swollen particleboard cores, however, rarely sand flat.

Check 03 · Bio-Safety

Active Woodworm & Lead Paint Era

Flight holes from common furniture beetle (Anobium punctatum) that spill fresh, pale bore-dust (frass) onto dark paper indicate active larvae requiring permethrin treatment. On painted pieces made before 1978, never dry-sand; always use chemical wet-stripping poultices or encapsulate over wet-abraded surfaces.

Workshop Sequence

Casein Milk Paint, Hemp Oil & Jute Webbing

Traditional powdered milk paint (made from milk protein casein, slaked lime, and earth pigments) absorbs into bare wood or bonds over adhesion primer with a velvety, zero-brushstroke finish that acrylics cannot imitate.

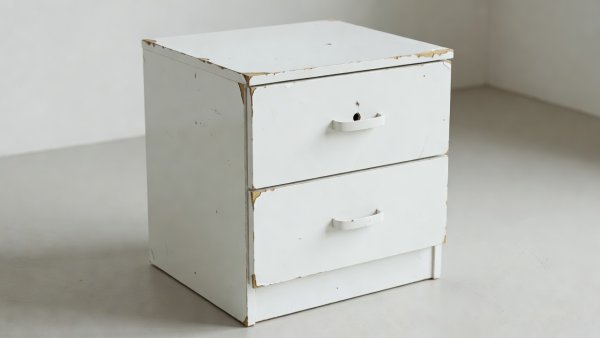
Before · Scratched Laminate Side Table
Soft-lit 3D render of a boxy white melamine bedside cabinet with chipped corners and a missing plastic handle

Boxy Melamine Bedside Unit

Slick resin surface with raw chipboard showing along the drawer top and hollow-feeling plastic runners.

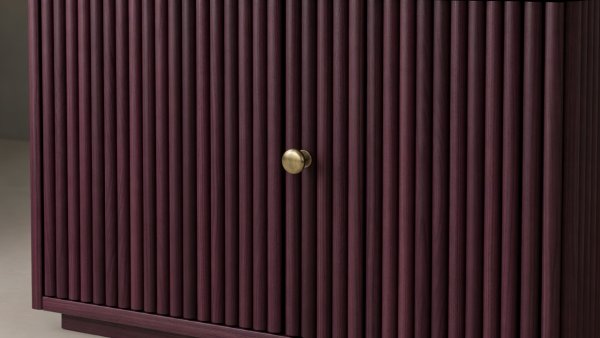
After · Half-Dowel Tambour & Plum Pigment
Soft-lit 3D render of the cabinet clad in vertical 12mm half-round beech dowels stained deep plum with a turned brass knob

Re-Faced Fluted Drawer & Turned Foot Upgrade

Drawer face clad in 12mm half-round pine moulding strips mitred cleanly at the ends, raised 120mm on tapered beech legs bolted through corner plates.

1

De-Glossing Without Dust Clouds

Wash the piece down with sugar soap solution using a green abrasive scouring pad to strip wax, silicone furniture polish, and kitchen grease. Once dry, scuff-sand the surface by hand with 150-grit aluminium oxide paper just until the specular reflection disappears—you do not need to sand down to bare wood unless staining.

2

Re-Proportioning with Plinths or Tapered Feet

Low, squat chests immediately look more architectural when lifted off the floor. Glue and screw 18mm plywood reinforcement squares inside the base corners, then mount angled steel leg plates and screw-in solid timber legs salvaged from broken mid-century chairs.

3

Cross-Weaving a Drop-In Stool Frame

If a stool or chair has a collapsed foam pad, strip the staples out with a tack lifter. Stretch 50mm Herringbone jute upholstery webbing across the open timber rails using a manual wooden webbing stretcher, folding the cut ends twice and securing each end with five 10mm blued upholstery tacks in a staggered W-pattern.

Check Abrasives & Primer Specifications